Ships, aircraft and rockets are extremely complex engineering systems with many thousands of components. In the construction of such systems it is impossible to complete avoid the presence of flaws such as cracks. Understanding the strength of materials in the presence of cracks is thus key to developing reliable aerospace and ocean engineering hardware. This experiment is designed to illustrate how strength in the presence of cracks - termed Fracture Toughness - is characterized and measured. You will get to measure the fracture toughness of aluminum - the dominant material used to build aircraft and spacecraft.
Stress around a crack
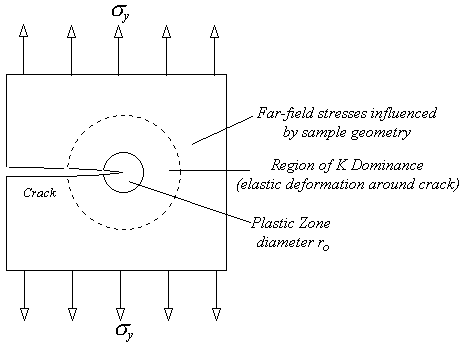
Consider the idealized situation shown in figure 1. This shows a uniform material of infinite extent that contains a semi-infinite
horizontal crack coincident with the negative x axis. The crack is
being pulled apart by a stress acting in the y direction sy that far away from the crack is uniform throughout the material.
The stress concentration in the vicinity of the crack may be determined analytically
if the crack tip is assumed to be sharp and the material is allowed to deform
only in a linear elastic fashion. Such an analysis shows that, along the
positive x axis,
The real situation is of course more complicated. Consider the cracked material specimen in figure 2. Immediately surrounding the crack the large stresses predicted by LEFM and the above equation are not realized because the material does not behave in a linear elastic fashion here. In a metal, plastic yeilding occurs to relieve and redistribute the stresses. In other materials, such as polymers or ceramics, different types of deformation, such as crazing or micro-cracking, may occur. The above equation is also unrealistic far from the crack where the shape of the specimen and the loading conditions determine the stress field. In between these regions, however, is a region where the crack dominates the stress field and the material deforms elastically. This is called the region of K dominance. Equation (1) is valid here.
Fortunately, as long as the plastic zone remains small compared to the specimen size, the region of K dominance controls the behavior of the crack. This means, for example, that we can use the stress intensity K to characterize the strength of the stress field surrounding the crack.
Fracture and fracture toughness
Suppose the load on the specimen in figure 2
is increased until it fractures, i.e. the crack grows. The resistance to
fracture may be characterized by the stress intensity at fracture K
c, called the fracture toughness. The fracture toughness
and the manner in which the crack grows is heavily dependent upon the material
thickness.
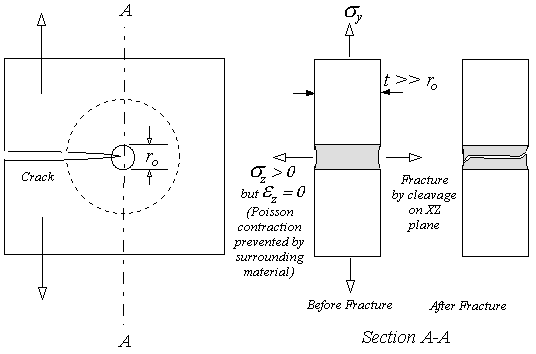
Consider a specimen having a thickness t that is small compared to the diameter of the plastic zone ro, figure 3a. As the crack is pulled apart the plastic zone will undergo Poisson contraction, relieving stresses sz acting through the sample in the z direction. We call this situation plane stress because stresses are only acting in the x-y plane. With sy large and sz near zero the shear stress on the 45o plane between the y and z axes is at a maximum. The crack therefore tends to orient itself along this plane as it grows. This type of crack growth is usually stable and gradual and is characterized as tearing.
Now consider a specimen having a thickness t that is large compared to ro, figure 3b. As the crack is pulled apart the material above and below the plastic zone prevents Poisson contraction from occurring throughout most of the sample. This sets up large sz stresses in the plastic zone. We call this situation plane strain because material is straining only in the x-y plane. With sz comparable to sy, the shear stresses are small so the crack tends to orient itself in a plane perpendicular to sy as it grows. This type of growth is usually unstable and is characterized as cleavage. Note that even with a thick sample there will be a thin regions close to its surfaces where Poisson contraction will take place and failure on 45o planes will occur.
Thicknesses between those that result in plane strain or plane stress are termed mixed, with plane strain occurring in the interior and plane stress some significant distance from the surface.
Because the Poisson contraction in a thin specimen relieves some
of the stress, the fracture toughness of such a sample is relatively high.
As the sample thickness increases and the form of the stress distribution
changes the fracture toughness falls, asymptoting to a constant value for
plane strain. Because of its independence of sample thickness this asymptote,
termed the plane strain fracture toughness KIc, is
considered a material property.
The objective of this experiment is to determine the plane-strain fracture toughness of 7075-T651 aluminum. The fracture toughness testing procedures specified in ASTM Standard No. E399 will be used. Three compact specimens (see figure 4) of nominal thickness 1/8", 1/4" and 3/4" will be tested. Each sample contains a notch, or 'machined crack'. At the tip of the notch a true crack has been produced by repeatedly loading (fatiguing) the specimen.
To determine their fracture toughness each of the samples will be pulled apart by applying load to a pair of dowel pins mounted through the holes in each sample. The load on the sample P vs. the opening of the crack (the displacement v) will be recorded. These data, plus the sample dimensions will then be used to
To load the sample an Instron 4204 Universal Testing Machine will be used, connected to a computer running a Labview program. The computer is used to log the test data, but it doesn't control the testing machine. Control of the machine is through control pad on the right of the test assembly, see the inventory photos. The machine has a crosshead - a horizontal bar - that can be accurately traversed up and down by means of two large jack screws. Specimens are tested by attaching them between the crosshead and the stationary base of the machine and then traversing the crosshead up to place the sample under increasing load. The load on the sample is recorded by a piezo-electric load cell mounted between the sample and the crosshead. The range of the load cell output and its calibration are provided internally to the computer program. You can assume that the uncertainty in the indicated load is the same as the uncertainty in its offset, which you can judge by examining the typical indicated load on the sample when no force is being applied.
The testing machine is a potentially dangerous device and should be treated with great respect. A specially trained operator will be on hand (either your TA or a faculty member) to run the machine and give you safety advice. There is an emergency stop button. If you are not told, ask where it is. Do not touch any other controls on the machine without express instructions from the operator.
To measure the opening of the crack an MTS Extensometer is used. Be sure to write down the model number during the test. The extensometer has two jaws that mount to the side of the specimen on either side of the machine crack opening. The extensometer is operated by the same controller that runs the testing machine and its output is fed to the computer. You can assume that the uncertainty in the indicated displacement is the same as the uncertainty in its offset, which you will be able to judge from the raw load vs. displacement plots provided by the computer and/or by examining the typical displacement indicated when no force is being applied.
You will be given specific instructions on how to use the computer and
software at the
time of the experiment. Don't forget to make a complete list of the apparatus
and instrumentation you are using ready for your report.
Unlike the other experiments in AOE 3054 this one has a defined procedure. This is because of the importance (to safety) of using the testing machine correctly and the difficulty of preparing good samples (limiting each lab group to 3). Ironically this makes it all the more important that you cast a critical eye on the procedure, apparatus and instrumentation you are given. It is all too easy with a set procedure to assume that all the errors have been characterized and sorted out already (they haven't). Therefore preparation of a detailed electronic lab book will be a key component of performing an effective experiment, from deciding (as a group) what the objectives of the lab really are, to recording dimensions and characteristics you are maybe not asked for, to documenting the apparatus and its flaws through good digital photography. In addition to the apparatus described above you will have at your disposal the (now usual) camera and extra measuring instruments. As always objective observation, as opposed to "matching the theory" is what is being asked.
This entire section should be read before embarking on the experiment. Copy a blank version of table 1 to your log book in advance of the lab.
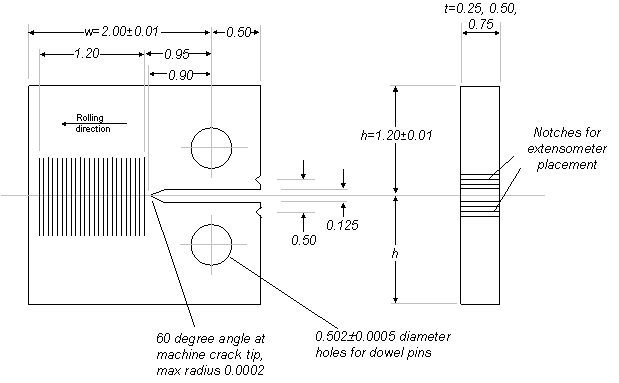
Determining the sample dimensions (see figure
4)
Measure the half height h and width (to hole centers) w of
each of your samples using the caliper provided. Measure the thickness
t of each sample using the micrometer. The length of the initial crack
ai, measured from the hole centers will also be needed.
However, it is unlikely that this will be clearly visible until you can examine
the fracture surfaces after the sample is broken. A close up photograph and
notes on any sample flaws might make good additions to the logbook. Estimate
primary uncertainties in these measurements.
Preparing the sample for test
Before testing the specimen it is necessary to attach the extensometer using
rubber bands. The jaws of the extensometer rest in notches cut into the side of the sample (see
figure 4). A small pin holds the jaws fixed while the extensometer is not in use. Attaching the extensometer is
an awkward operation at best. Have your TA explain how to do it. Photo?
Mounting the specimen in the testing machine
Load is applied to the specimen through two half-inch diameter dowel pins.
The pins pass through the holes in the specimen and matching holes in two
clevis grips. Three pairs of clevis grips (with 1/8", 1/4" and 3/4" slots)
are available. Select the pair of grips that match the specimen under test.
Mount one to the base of the testing machine and one to the crosshead using
the dowel pins provided. If necessary get the operator to move the crosshead
up to give you enough space. Make sure that the flat side of both grips face
to the left. Place the specimen in the slot in the lower grip with the extensometer
on the left and secure it with a dowel pin. (Note that the dowel pin should
be a snug fit, but you should be able to push it in by hand. Don't be tempted
to hammer the pin in or you may never get it out). Have the operator lower
the crosshead slowly until the holes in the sample and upper grip line up
accurately enough to push a dowel pin through them. Are you really happy
with how the sample sits in the jaws, how well the extensometer sits in the
grooves? Estimate the primary uncertainty in the load by looking at the load
with no force being applied. Estimate the primary uncertainty in displacement by
looking at the fluctuations in indicated displacement as the sample sits there
(the displacement will be zeroed before the test, and so only the perturbations
from that zero will be visible).
Running the test
Remove the pin holding the extensometer jaws. Set the computer program ready
to take data. Ask the operator to begin the test. He/she will set the Testing
Machine controller to raise the crosshead at a speed of 0.05 inches per minute.
As the test begins watch the drawing of the load/displacement diagram. Initially
it should appear as a straight diagonal line showing the initial elastic
deformation of the specimen. If you don't see this, alert the operator so
that the test may be halted and the problem diagnosed before the sample is
destroyed. Record all that happens, it may be a factor in the results you
get.
As the load on the sample increases, you will begin to see its surface
dimple around the crack (photo?). This dimpling is produced by Poisson contraction
of the material in the plastic zone. As the sample begins to fracture different
things will happen depending on its thickness (see 'Identifying the load
at fracture' below). The sample may fail suddenly, or it may tear. In the
latter case you may hear a popping sound. This is the sound of the crack
intermittently growing. The test continues until the extensometer has reached
the limit of its range. At this time the extensometer
is removed and the crosshead is raised to completely separate the two halves
of the sample. Remove the remains of the sample from the testing machine
ready for the data analysis, and save and transfer your load and displacement
data so you can plot your P-v diagram in the logbook.
Record your analysis in the lab book in a programmed version of table 1
(a) Examination of the specimen
Look over the fracture surfaces. The initial crack should be fairly obvious.
Measure its average length ai, allowing for the 0.9" distance
from the end of the machine crack to the hole centers, noting particularly
if it is not uniform through the specimen thickness. Look at and photograph
(in plan view and cross section) the fracture itself. How much of the fracture
occurs on a 45o plane? Estimate primary uncertainties in this
measurement.
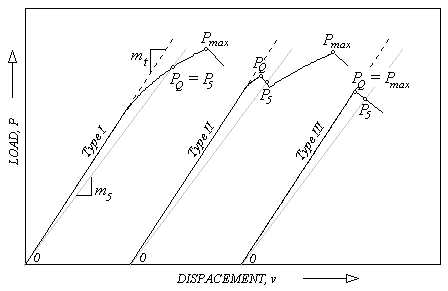
(b) Identifying the load at fracture
Import your load and displacement data into your logbook. Plot the P-v diagram
and compare it with the samples shown in
figure 5
. Initially the P-v diagram is linear because the sample deforms elastically.
You will likely have to shift the origin of the plot so it lines up with this
linear region (this is easily done in Excel by subtracting or adding a constant
to the displacement values). How accurately can you determine the origin of the load and
displacement? Use this information to modify you estimates of primary
uncertainty in these. At fracture the crack will grow changing the sample stiffness and causing
the P-v diagram to depart from a straight line. How this departure
occurs depends on how the sample fractures. If cleavage is dominant then
there will be a sharp break in the P-v diagram at fracture (
figure 5
, type III). If tearing is dominant (figure 5
, type I) then the P-v diagram will become curved as fracture begins.
A mixture of fracture mechanisms will produce a smooth curve punctuated by
discontinuities of unstable crack growth (figure 5
, type II). These discontinuities are called 'pop in' since they produce
the audible popping sound.
With such a variety of behavior, a consistent definition of the load at fracture PQ is needed. Figure 5 illustrates this. A line is drawn from the origin with a slope (m 5) equal to 95% of the slope (mt) of the initial linear portion of the P-v curve. The load at fracture is then taken as the maximum load supported by the sample in advance of the point where OB intersects the P-v curve. Obviously you need to think about, and quantify (in the logbook) the uncertanty in getting PQ as this may be a major factor in your stress intensity uncertainty. Note that it easiest to construct this 95% slope line using the drawing tools in Excel or PowerPoint: Draw a line over your chart equal to the slope of the initial linear portion. Double-click on the line, select the 'Size' tab, and set the height scaling to 95%. Close the dialog and move the line so it once more cuts the origin of the P-v curve.
(c) Determining the stress intensity at fracture KQ
The relationship between the stress intensity and the load applied to the
sample is not a simple one since it depends on the form of the stress field
far from the crack where the shape of the sample and its precise loading
conditions are important. To take these into account it is necessary to perform
a finite element computation, using the theory of elasticity, of the stress
field in the sample. Such a computation has already been performed for the
compact specimen geometry used in the present experiment. The following function
is a curve fit to the results of this computation

(d) Determining whether sample was in plane stress or plane strain
The relationships listed in section (d) of
table 1
, from ASTM Standard No. E399, are used to determine whether the sample was
in plane stress or plane strain. Specifically, if both conditions (on
KQ and PQ) are met then the sample was
in plane strain, otherwise it was in plane stress. Note that
so is the yield strength of the sample material (79.1ksi), h
, t and w are the sample dimensions. See if the answers you
get agree with your own judgments based upon how the sample failed. Would
changes to the various parameters within their uncertainty influence the
conclusions here? figure this out as a group.
(e) Determining whether the plastic zone size and final results
The relationships listed in section (e) of
table 1
(also from ASTM Standard No. E399) are used to determine the size of the
plastic zone. As noted above, the plastic zone must be small compared to
the sample size for the LEFM used to generate equation (2) to be valid. How
do the results you get here compare with your impressions of the dimpling
during the test? If LEFM is valid, interpret your value of KQ
as Kc or KIc. Try to estimate their
uncertainties.
Traditionally, test reports are as brief as possible (while being complete). It is expected that, by this stage in the course, you will have a good feel for the correct report format so no specific help is given here. However, please note that your report must include, at least;


| TABLE 1. DATA ANALYSIS | Specimen 1 | Specimen 2 | Specimen 3 |
|---|---|---|---|
|
|
|||
| Specimen Material | 7075-T651 Aluminum | ||
| Yeild Strength (ksi) | 79.1 | 79.1 | 79.1 |
| Specimen half-height h (in) - see figure 4 | |||
| Specimen width measured to hole centers w (in) | |||
| Specimen thickness (micrometer measurement) t | |||
| Crack length (measured after fracture from hole centers = actual crack length+0.9") ai |
|||
|
|
|||
| Initial slope of elastic deformation line mt (in inches per inch on plot) |
|||
| m5 = 95% mt | |||
| Load P5 at intersection of load displacement curve
and line of slope m5 drawn from origin |
|||
| Maximum load Pmax | |||
| PQ (chosen according to figure 5 ) | |||
|
|
|||
| Non-dimensional crack length |
|||
| Stress intensity at fracture KQ (eqn. 2) | |||
|
|
|||
| 2.5(KQ/ |
|||
| Is 2.5(KQ/ |
|||
| Pmax/PQ | |||
| Is Pmax/PQ less than 1.1? | |||
| Plane stress or plane strain? | |||
|
|
|||
| For plane strain compute... | |||
| Plastic zone size ro = (KQ/ |
|||
| Plane strain fracture Toughness KIc = KQ | |||
| For plane stress compute... | |||
| Plastic zone size ro = (KQ/ |
|||
| Is LEFM valid ? (i.e. is 4ro less than ai
, (w - ai) and h? |
|||
| If LEFM is valid, what is Kc = KQ? | |||